[Warning] This post has just about nothing to do with crafting...
I decided yesterday that it was time, time to potty train. Oh goodness.
I have a 2 year old son and another son that will be 4 in December. I was trying to toilet train the 3 1/2 year old last fall, but found out I was preggers again... whole nother story.
So, our pediatrician recommended that I wait until after the new baby is born to train him. If I did it then, there is/was a large chance that he would just revert when the new baby arrived, and it would be next to impossible to train him again. errr
This morning I awoke early to go to good old Wal-Mart (by myself) and buy the basic potty chair, no cushions, bells, or whistles please (we already have one with too many parts to take apart and disinfect for me). I got two so that each boy could have their own. [Enter new potties]
Now, each boy will sit on his potty all day long. We will be watching movies, reading books, playing cars, eating, and Lord knows what else to keep them there (please help Lord!). Maybe I should bust out some felt, yarn, and yarn needles as a fun project for them. (there's the only crafting in here, sorry :)
It is now 11:30 am, and I am happy to say that they have successfully been sitting on the potty since 7 am this morning. Lots of happy dances, rinsing potties, and only a few toys to go into the dishwasher (they got potty dipped, eww).
All there is to fear now is naptime and bedtime, I have a feeling that's when the "big jobs" will happen...

August 31, 2009
August 29, 2009
Thank You JenieShell
I have been trying to figure out how to make a super cute button like so many other blogs/website have. And, thanks to JenieShell I was able to do it just now!!! Oh the wonderful things that get accomplished during naptime :)
Here's the posts I used:
Make the Button
Make the Scroll Box
I am sure I will be using this blog to make some more nifty things for mine ;)
Here's the posts I used:
Make the Button
Make the Scroll Box
I am sure I will be using this blog to make some more nifty things for mine ;)
I Got a Deal!
 So, here is the loot :)
It just so happened that we were about to run out of Pull-Ups. And, even though I really would prefer to use cloth trainers with snap sides, I have just been a little busy lately and unable to make some. They are in the work-in-progress pile. Sorry, back to my big savings :)
Transaction:
2 Jumbo Packs Pull-Ups at $11.99 each---- $23.98
1 pack Textured Cotton rounds-------------- $1.29
subtotal: $25.27
Coupons:
$5 off $25 purchase from Walgreens (signed up for emails from their website)
$5 off Pull-Ups Jumbo sized pack or larger (signed up for mailings from their website)
Total: $10.27
That's right folks, I paid less that the cost of just one pack of Pull-Ups for 2 packs and cotton rounds (these were somewhat needed, and I picked them also to get over $25 for the store coupon). Go me, I was doing a happy dance when I got in the car, even called my husband I was so excited!
August 28, 2009
Jumper/Onsie Refab- Tutorial
This refab (just short for re-fabrication) is so easy, I just might look for these jumper/onsie things more often! I picked this one up at GW (GoodWill) when they were having their Tuesdays Sales in August last year, all kids summer items are $1. We're going from jumper/onsie to shirt.
 What you will need:
Start off by laying the garment down, making sure that all the seams are flat, and the front and back are aligned. Place your ruler as close to the seams from the button bands as possible, making sure to square the ruler with the sides of your garment. Either use the rotary cutter and cut the bottom part off, or mark a straight line and cut with scissors.
 **Side note: I like to buy jumpers with stripes, as long as the side seams are matched up (like below), then all you have to do is follow the stripe all the way around when you cut without even having to measure or draw a line.**
 Next, fold the bottom of the garment-now a shirt :)- up 1/4 inch, and again 1/4 inch. This makes sure that the raw edge of the fabric is securely sewn under. And, pin. With stretchy t-shirt material, I like to pin a lot so that you are not trying to re-adjust while you are sewing, that will give you a wavy finished edge, not so pretty.
 After you pin, you thread your double needles with the coordinating thread, and sew with the right side of the fabric facing up. (If using a single needle, I recommend sewing it with the wrong side facing upwards, and threading the bobbin with the coordinating thread). I like to use white thread as the thread that will not be seen, since I have tons of white and much much less of colors.
 Ta-Da, you're done!
 What you will need:
- Jumper/Onsie that looks like it's too short for the child (this one is size 24 months, but was wide, and I'm making it for my 3 1/2 year old)
- Quilting ruler- clear, 6 x 24 inches, roughly
- Rotary cutter or Scissors
- Coordinating thread
- Marker or chalk pencil
- Double needle for sewing machine (single needle instructions in parenthesis)
- Sewing machine, pins, etc.
Start off by laying the garment down, making sure that all the seams are flat, and the front and back are aligned. Place your ruler as close to the seams from the button bands as possible, making sure to square the ruler with the sides of your garment. Either use the rotary cutter and cut the bottom part off, or mark a straight line and cut with scissors.
 **Side note: I like to buy jumpers with stripes, as long as the side seams are matched up (like below), then all you have to do is follow the stripe all the way around when you cut without even having to measure or draw a line.**
 Next, fold the bottom of the garment-now a shirt :)- up 1/4 inch, and again 1/4 inch. This makes sure that the raw edge of the fabric is securely sewn under. And, pin. With stretchy t-shirt material, I like to pin a lot so that you are not trying to re-adjust while you are sewing, that will give you a wavy finished edge, not so pretty.
 After you pin, you thread your double needles with the coordinating thread, and sew with the right side of the fabric facing up. (If using a single needle, I recommend sewing it with the wrong side facing upwards, and threading the bobbin with the coordinating thread). I like to use white thread as the thread that will not be seen, since I have tons of white and much much less of colors.
 Ta-Da, you're done!
Friday Find: Deal Seeking Mom
This blog has tons of stuff, from indexes of coupons (here) to even matching up coupons you can print from them to the weekly adds of local grocery stores (here). There is even a section/link to free samples you can order from various companies. Can you say awesome?
Not only that, but this site has coupons ranging from Victoria Secret to Go-Gurt. Now, what mom doesn't need a little of both those things ;)
August 25, 2009
Fun Baby Hat
 I had this hat from when my boys were little. It was rather gender neutral, and a little boring for me to have my cuteness of a baby girl wearing it. So, what's a girl to do?? Make some yo-yos! It literally took my about 15 minutes to make these 2 yo-yos from some scraps and sew them on. Instantly better :)
August 21, 2009
Friday Find: Pogibabies
I saw this hat quite a while ago and fell in love with it. I even asked the shop owner if she could make it in my size, but babies only :( But, now that I have another little girl, I can promise I will be buying one of these!!
Check out her shop, Pogibabies, she's got some awesome stuff.

 But, now that I have another little girl, I can promise I will be buying one of these!!
Check out her shop, Pogibabies, she's got some awesome stuff.

August 14, 2009
Friday Find: Bakerella
Oh my goodness. I know that I posted about her Pie on a Stick recently, but seriously, I think I need to make just about everything this woman blogs about!! I do believe I have found someone who has a love for pound cake just about as much as I do. Whomever is behind Bakerella is simply genius!
Just look at some on the things she hast posted about:

 These "meals" are cupcakes, brownies, and cookies!! I WILL be making these soon (and gaining at least 5 lbs. making/devouring them).
If this were my blog, and I was anywhere near this talented in the desserts arena, I think I would weigh like 300 pounds, and I am not kidding...
Just look at some on the things she hast posted about:


 These "meals" are cupcakes, brownies, and cookies!! I WILL be making these soon (and gaining at least 5 lbs. making/devouring them).
If this were my blog, and I was anywhere near this talented in the desserts arena, I think I would weigh like 300 pounds, and I am not kidding...
August 7, 2009
Booster Car Seat Cover- Tutorial
Ok, those of us that have bigger little kids know about these, and how incredibly ugly they are. One gets about three to five choices of what kind of fabric to choose: black, princess, Dora, cars, and maybe a boy cartoon figure. So, in other words, all really ugly/kiddy fabric. I decided that enough was enough, so here is a tutorial about how to turn it into one of these (yay!):
What you will need:
 Following the seams already on your car seat, sew the 2 layers of fabric to the cushion. Leave about 1/2 to 1/4 of an inch unsewn at the bottom of the cushion, or the part that goes on the front of the car seat.

Next, open the fabric that you have just sewn onto the cushion so that the side piece you just attached is right side up. Baste this side piece to the edging of the cushion. Lay the remaining piece of fabric on the middle fabric and pin in place. Again, following the existing seam, sew the last side piece to the cushion. And, again, leaving between 1/2 and 1/4 of an inch unsewn at the bottom of the cushion, or the part that goes on the front of the car seat.

Again, open the fabric you have just sewn so that the side piece is right side up, and baste to the edging of the cushion. Sew the cover fabric to the cushion at the top end, or the end that goes at the back of the car seat, trim.
 Fold the fabric under on the bottom, or the part of the cushion that goes on the front of the car seat. Do a blind stitch to secure this fabric, since this part will be visible. (I don't have a photo of this because I didn't realize it would be visible until I put it all back together... oops. So, you can see a blanket stitch on mine in the front of the cushion.)
Finally, sew the FOE or bias tape over the sides of the cushion, and TA DA!


 I decided that enough was enough, so here is a tutorial about how to turn it into one of these (yay!):
What you will need:

- Car seat cushion
- 3 strips of fabric about 19 inches by 5 inches
- 1 1/4 yard of 1 inch FOE or 1 yard of extra wide double fold bias tape
- thread, sewing machine, pins, scissors, etc.
 Following the seams already on your car seat, sew the 2 layers of fabric to the cushion. Leave about 1/2 to 1/4 of an inch unsewn at the bottom of the cushion, or the part that goes on the front of the car seat.

Next, open the fabric that you have just sewn onto the cushion so that the side piece you just attached is right side up. Baste this side piece to the edging of the cushion.
 Lay the remaining piece of fabric on the middle fabric and pin in place. Again, following the existing seam, sew the last side piece to the cushion. And, again, leaving between 1/2 and 1/4 of an inch unsewn at the bottom of the cushion, or the part that goes on the front of the car seat.

Again, open the fabric you have just sewn so that the side piece is right side up, and baste to the edging of the cushion.
 Sew the cover fabric to the cushion at the top end, or the end that goes at the back of the car seat, trim.
 Fold the fabric under on the bottom, or the part of the cushion that goes on the front of the car seat. Do a blind stitch to secure this fabric, since this part will be visible. (I don't have a photo of this because I didn't realize it would be visible until I put it all back together... oops. So, you can see a blanket stitch on mine in the front of the cushion.)
Finally, sew the FOE or bias tape over the sides of the cushion, and TA DA!
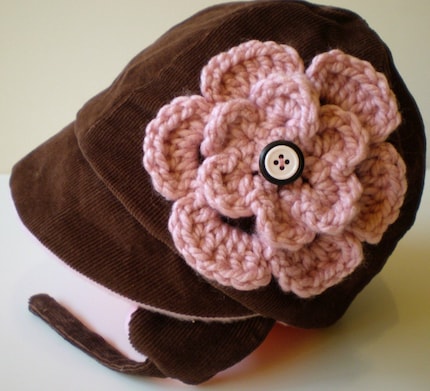
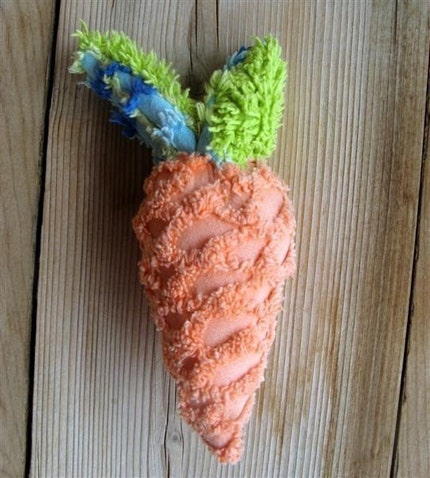
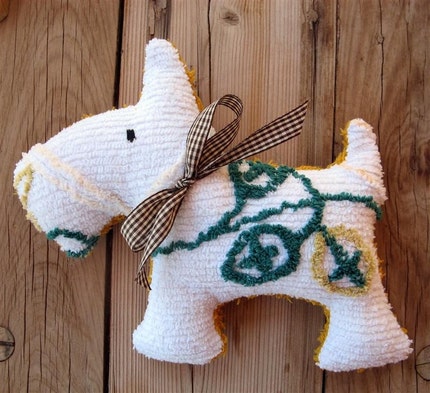
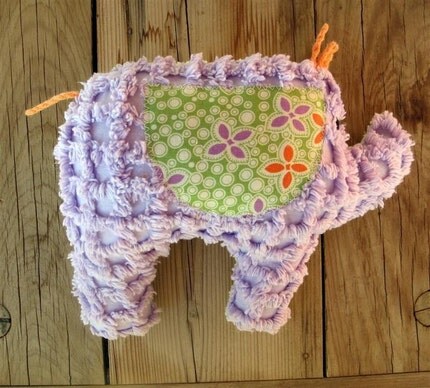
Friday Find: Vintage Chenile
Yay, another super cute crafter to be the next Friday Find! I came across this Etsy-er when I was participating in the Online Baby Shower that I found (another post for another day:) ). I fell in love with her stuffed toys!
The shop's name is Vintage Chenille, and here are just a few of her cuties:


The shop's name is Vintage Chenille, and here are just a few of her cuties:
August 4, 2009
Can I Say YUM?!?!
I have to admit, when I was a kid, I hated pie. I know, what was wrong with me?! Since then, I have come to love love fruit pies, and pumpkin, and pecan, ok, I just love pie I guess. Anywho, I was browsing some blogs just now and came across these on a cute little blog called Bakerella:
 Oh good gracious!!! I need to make me some, maybe even right now, I think I have a pie crust in the fridge... and the babies are sleeping...
Oh good gracious!!! I need to make me some, maybe even right now, I think I have a pie crust in the fridge... and the babies are sleeping...
August 1, 2009
Giveaways Galore!!
If any of you are cloth diapering, or considering it, then you need to check out Life More Simply. Rachel is the blog author, and she has done some serious testing and reviewing, and got tons and TONS of giveaways!!
Subscribe to:
Posts (Atom)
