April 30, 2009

Infants Bandana Shirt- Tutorial


This was something I came across quite a while ago in the library, of all places. There was a vintage clothing book that I borrowed, and so many ideas spawned from this one book.

Needless to say, there was a pattern to make a bandana shirt, but I created one, just to have my 'own'. So quick and easy!
This pattern makes a shirt for a 3-6 month old (approximately- every baby is different!) and uses a 20 inch square bandana. You could make a large size if you have a larger bandana, or even a square silk scarf (that's next on my list for me... :) ), just use the same proportions.
What You Need:
-1 bandana- 20 inches
-About a yard of bias tape
-Thread
-Sewing machine
-Scissors
-Ruler
First, you need to fold the bandana in half, then in half again (into 4ths). Pin the bandana together around the edges to hold all the layers together.
Then, trace your pattern onto the bandana. The piece for the neck will cut out a 3 1/2 inch circle from the folded corner. So, measure 1 3/4 inches from the corner down each folded side, and draw an arc to joint them. The piece to cut out to make the sleeve and body is measured this way: From the bottom corner that has all the corners from the bandana stacked, measure 6 3/8 inches up and mark a small dot. From that dot, draw a straight line 4 1/2 inches in length perpendicular to the fabric edge. Next, on the same edge of the bandana you just drew the line from, come down 1 1/4 inches and mark a small dot 5 inches from the edge (you will draw the next line to this point). Next, measure 3 3/8 inches from the corner, that has all the corners from the bandana stacked, down the other side and mark a small dot, draw a line 5 1/4 inches long meeting with the dot you just drew. Now, draw an arc connecting the 2 lines. Hardest part is now done! Cut along the lines you just drew.
Now, unfold the bandana, and from the center, where there is now a hole, cut a straight line down the back measuring about 3 inches toward the bottom, this will give more headroom when dressing. MAKE SURE YOU CUT DOWN THE BACK AND NOT A SLEEVE!! (The sleeves are narrower). Now, sew the sleeve/side seams, making sure the wrong sides of the fabric are facing out, if it's hard to tell with the appearance/color of the fabric, look at the hems.
Next step is to apply the bias tape. You first start from the top of where you cut the line down the back. I use a zigzag stitch to first apply the tape to the shirt, with the right side of fabric up to make sure it is secured.
Then I fold it over, and stitch a straight seam as close to the edge of the bias as possible. Now that you have gone down and up the cut you made, it's time to do the neck edging. Leave about 6 inches past the edge of the neck fabric to make a tie, then sew the bias on in the same manner as the last piece you just did. Leave another 6 inches on the other end. Stitch or heat seal the edges of the bias, and you're done!

April 28, 2009

Pick Your Own Friuts/Veggies

It is coming up on the time of year for FRESH LOCAL PRODUCE!!! YEAAA!

The best website I have found for information on local pick your own farms is: www.pickyourown.org. So, go out there and support your local farmers (call first, some places may have gone out of business).

My family very much so enjoys going a picking fruits and veggies. The little ones don't quite get it yet, but we all have lots of fun! And, we get to come home and can or freeze everything we won't eat that week or so. Honestly, this is the most rewarding part of our adventures. We end up with things like: homemade jams, sauces, drink mixes, and much more!


My book that I live by as far as canning goes is:

April 27, 2009

MYO Kids Pantry Toys- Tutorial

MYO= Make Your Own

My kids LOVE the kitchen. They love to cook, play with boxes and cans of food, help set the table and clean up. Sometimes I can't get them out of the kitchen!

For now though, it seems to be more difficult to accomplish what I need to with all 3 of them present. Luckily, we have a play kitchen for them, and instead of buying the toy food stuff they have at stores, which is usually all junk food that we don't eat anyways, I recycle some of out stuff to toys for them. Here's how:

You'll need:
-box to turn into toy
-plastic grocery bags
-clear packaging tape
First, stuff the box with grocery bags until it is as firm as you would like. Before I had my boys, I put less into each box, but the boys like to step on the boxes. So, to make them last a little longer, I stuff them pretty full now.
Next, get a small piece of tap just to close the top of the box.

Then, I put the tape first on the top and bottom, making sure to go about an inch down the sides. Then I start at the top of bottom, and wrap the tape all the way around the box, trying to stay level, and overlap about an inch. Cut the tape, and move up/down the box. You will essentially be making stripes of tape all the way up the box that overlap about 1/4 inch.
The last step I like to do is: hold the scissors like when you are walking, on the blades with them closed, and use the handle to rub the tape in well. There is usually a white looking film between the tape and whatever you put it on, but it will disappear as you rub it with the scissors. Don't worry if your tape didn't cover every single part of the box, it's not going to last forever, and your kids will probably grow out of the toy kitchen too.

And, when you're all done with the box, just cut it open, take out the bags, and RECYCLE all of it!

My Latest Quilting Venture

With expecting a baby girl, and knowing a few ladies who are also, I decided to make a butterfly quilt! I took such a long time trying to figure out what I wanted to make for our little baby, but haven't fallen in love with ANYTHING for her yet, not fabric, yarn, anything. I can't believe I'm in a project block with this one...

But, this is something I decided to make, just to make, probably to sell, to see if it would spawn any ideas, and I've gotten a few.

I only have the top pieced, and all the layers pinned right now. So, all that's left is to quilt and bind. I think it turned out quite well. I used the pattern "and baby Takes '3'!" by Deirdre K. Brown. All I had to do was pick 3 fabrics, cut squares and rectangles according to the size block, and sew. SOO EASY!!
The block on the front I actually decided to rotate instead of keeping them all the same way. I ended up with somewhat of a heart pattern. Here's a close-up:

April 22, 2009

IT HAS ARRIVED!!!

I have been waiting and waiting for my snap press to arrive, and it FINALLY has!! YEEEAAAA!!! Here it is, isn't it beautiful?!?!

And, of course, I couldn't wait to play with it!! Since I always like to do at least one trial run with new toys, I decided to make one of my son's velcro diapers into a snap one. He knows how to take off the velcro ones anyway, so we kinda needed a solution for that one.... :) So, onto the chopping block went a Blueberry dipe, I love love these (http://www.blueberrydiapers.com/) I just wasn't feelin the velcro anymore.It turned out rather well, and, it fits great! The little Pooka can't even get it off now!! Score 1 for Mom :)

April 13, 2009

Boys Knitted Argyle Vest


I haven't made too many knitted items that weren't hats, scarves, blankets, or square items. And, it always seems to take me longer than I would like to finish these projects. My love for the relaxing nature of knitting always wins out!!

Since I try to make at least 3 holiday-specific items/outfits for my kids throughout the year (Easter, Halloween, and Christmas), what better to try out than a sweater vest for one of my boys? (I went with the older one, just incase I didn't finish it soon enough the younger could always grow into it :)

I SUCCEED in making this vest, and IN TIME!! YEA!! I just love how it turned out! Even though this is a little advanced (with the color-changing to create the argyle), I could have easily made it with just a solid color or stripe. (lots of options included in pattern, I did create my own argyle pattern).
I think next time I will change a few things, for example, I would do a deeper v-neck since kids have bigger heads proporionately. And, I would do all the argyle diamonds the same size so that the diagonal stripes go through the middle of all of them without having to be broken. But, all in all, I consider this project a success!!

So, I started with a book I have had for quite a while, but never made anything from. I love books that give you a basic, basic pattern and advise you to make it your own. The book is called "Style Your Own Kids Knits" by Kate Buller: image. This book gives patterns for kids sweaters, hats, bags, and motifs from size baby up to about 8 years! SO MANY OPTIONS!!!!
Here are my photos along the way:

Happy-Dance Time

Let me first start by saying, I love The Beatles! I grew up listening to them all the time with my Dad, one of my most favorite things from being a kid.

I was doing a little browsing of fabrics online the other day and came across this: http://www.fabric.com/SearchResults2.aspx?Source=Header&SearchText=beatles&CategoryID=1d5f47dc-9991-4088-93f3-26a376046a5e

(bear with me, I still need to learn a bit more about links on blogger)

Can you imagine my excitement?!?! BEATLES FABRIC!!!! AHHHHH!!!

I haven't ordered any yet for fear of ordering all that they have in stock :D. But, I've been thinking about what I can do with such fabric, and oh good gracious!!!


April 7, 2009

Make-It-And-Love-It Giveaway!

So, this blog that I frequent is doing a giveaway :)

Check it out!!!

http://makeitandloveit.blogspot.com/2009/04/3-part-giveaway.html

She's giving away a super-cute apron, and 2 onsie/shoe sets!

April 4, 2009

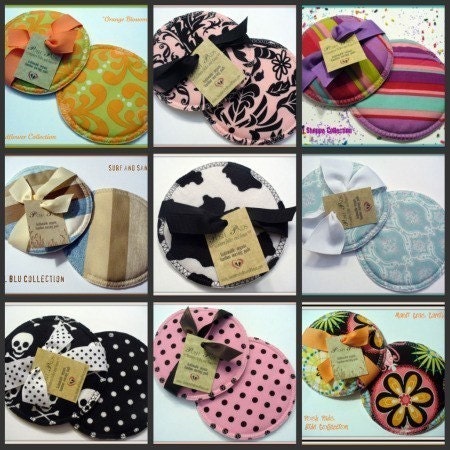
Re-Usable Nursing Pads

For any of you who may not know, I am expecting my 4th child in June. I have happily, and luckily, breastfed each of my children so far, and plan to do so with this one.

It was only with #3 that I discovered the wonderfulness of washable nursing pads. I bought a few brands that I was able to find at local stores, and they worked wonderfully for me.

As I was browsing on Etsy today, I came across the cutest, most adorable washable nursing pads ever! Even though I have quite a few, I am SERIOUSLY considering buying some of these!!! The shop is: southernbellesandbow.etsy.com. They are simply ADORABLE!!!

April 2, 2009

Pay It Forward

Pay It Forward Exchange is based on the concept of the movie "Pay it Forward". A friend of mine put this on her site, and I simply couldn't resist!!!

I will send a hand made gift to the first three people who leave a comment to this post on my blog requesting to join the PIF exchange. All the gifts will be made and posted out 'sometime within the next year'. How exciting to not know when your surprise package will arrive! What you need to do in return, is pay it forward by making the same promise on your blog. This Exchange is only open to those with active websites or blogs.

I'd love for you to join me! Will you be one of first three? Other comments are welcome, but only the first three will be my Pay It Forward recipients.
Related Posts Plugin for WordPress, Blogger...